The game commences at 10.00 am.
( Note: C denotes Confederate player turn whilst U denotes Union player turn )
Turn 1 - 10.00 - 10.30
01.01C The opening move. Davis' confederate brigade advances boldly through orchards upon Cutler's Union troops deployed in line on West McPherson ridge.
01.02C Simultaneously, Archer's bridgade advances through Herbst woods opposite Meredith's crack Iron Brigade.
01.03C Detail of Archer's advance through Herbst woods.
01.05U Cutler swings his right flank backwards to avoid possible flanking maneuvres by the rebs
01.06U Likewise, Meredith swings his right flank and is joined by Gamble's cavalry brigade of Buford's division. The cavalry promptly dismount and extend the Union firing line, their breech loading rifles giving withering firepower at close range.
At close of Turn 1 the scenario dictates a Fallen Leader test on the Union's General Reynolds who was killed by a stray bullet at the opening of the battle. Sure enough, the rebs rolled a 7 meaning Reynolds was shot out of his saddle and carried off the field.
Turn 2 - 10.30 - 11.00
02.04C - The confederate advance continues cautiously but relentlessly. In the meantime off-table rebel artillery target the Union troops on McPherson ridge. The first reinforcements appear on the table in support of the advancing brigades.
02.07U - Union reinforcements stream at the double up Seminary ridge. The famed Lutheran Seminary can be seen as the prominent red building in the background.
02.08 U- On McPherson ridge Wadsworth's division forms firing line and braces itself for the coming attack......
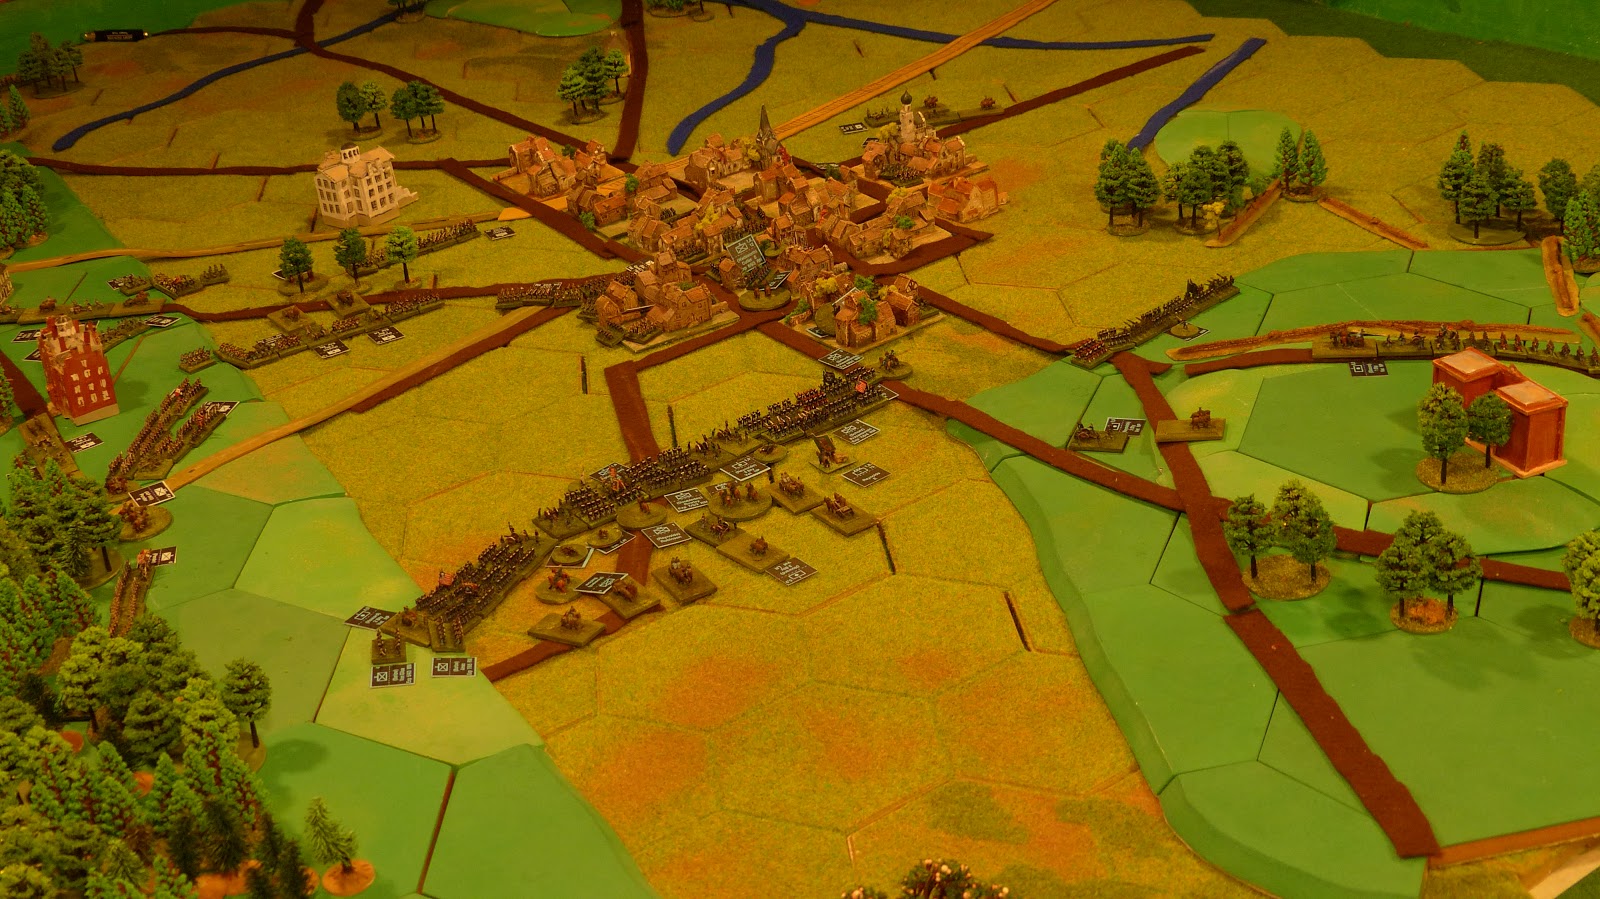
02.10U - This pic marks the start of a series of 'time lapse' photographs which give a bird's eye view of the field and hopefully makes it easier to follow. Gettysburg town is clearly visible at bottom left, Seminary rigde straddles the centre of the pic whilst the McPherson ridges with the Union firing lines are at the top.
Turn 3 - 11.00 - 11.30
03.01C - Heth's brigades charge uphill at the Union defenders.........
03.02C - ........ and are met by withering defensive fire.
03.03C - The Confederate charges falter and are repulsed with heavy losses.
03.04U - More Union reinforcements rush towards Seminary ridge which is now soundly occupied by the Feds. West of McPherson ridge, Rowley's brigade appears on the field to the rear of Pettigrew's freshly arrived Confederates.
Turn 4 - 11.30 - 12.00
04.01C - More massed Confederate brigades arrive on the field. Pender's entire division deploys in supported line and advances on East McPherson ridge which is still defended by Meredith's Iron Brigade and Gamble's
dismounted cavalry. Stone's green brigade arrives on the ridge to bolster the defence and close the gap between Meredith and Cutler. In the meantime, more off-table batteries arrive for the rebs, bringing the total up to five.
04.02U - Not one to take things lying down, Meredith leads his men downhill on a surprise attack. The crack union troops smash into Pettigrew's disordered brigade, taking the rebs completely by surprise. Meanwhile, on west McPherson ridge, Buford's second cavalry brigade under Devin dismount on Davis' left flank and unleash the full power of their breech loaders, causing many casualties.
04.03U - Pettigrew's troops turn and run at the sight of the Feds' charge.
04.04U - The victorious Union troops conduct breakthrough movement and run into Perrin's brigade with Thomas in support. The charge is barely successful this time and only manages to push back the rebel troops to the further bank of Willoughby's Run, the minor river west of McPherson.
04.06 - Detail of Pender's division showing Perrin and Thomas' brigades west of Willoughby's Run faced by Meredith's brigade.
04.07 - Union defensive positions on Seminary Ridge under cover of orchards and groves.
To be continued.........

Turn 5 - 12.00 - 12.30
05.01C - View looking north along McPherson Ridge. At extreme left, Confederate brigades (Perrin & Thomas) bounce back and counterattack Meredith's Iron Brigade. In the far background the lead elements of Ewell's Corps start appearing on the field.
05.02C - Meredith is overwhelmed by sheer weight of numbers and is forced to withdraw in disorder back up the ridge, managing to form a firing line alongside Gamble's dismounted troopers.
05.03U - The Feds decide it is time to abandon McPherson Ridge. Gamble's cavalry mounts up and moves south in column whilst the rest of the infantry fall back on Seminary Ridge, now teeming with Union troops stationed all along the treeline on the west face. At lower foreground Union reinforcements debouch from the southern end of Seminary Ridge on the Confederate right.
Turn 6 - 12.30 - 13.00
06.01C - The rebel advance resumes. To the north (extreme background) more brigades of Ewell's command arrive on table and succeed in routing Devin's cavalry brigade. In the centre Perrin advances up McPherson Ridge but is immediately challenged by a Union artillery barrage from Seminary Ridge, causing casualties and disorder. At bottom left, Lane and Scales' brigades refuse their right flanks to counter the arrival of the Union columns.

At this point we closed our session for the day. Some end of session photos :
06.02 - The Confederate extreme right flank west of McPherson Ridge. Lane and Scales' brigades in the foreground, Perrin and Thomas in the background scaling the ridge.

06.03 - General view of McPherson and Seminary Ridges. The appearance of Ewell's fresh troops on the left bolster the rebel attack and force the Feds to abandon McPherson Ridge. In foreground Perrin and Thomas get a taste of things to come when they are met with artillery fire as soon as they reach the heights of the ridge.

06.04 - View of the field looking south east from behind Ewell's lines. The woods and orchards on Seminary Ridge bristle with Union defenders. Behind the ridge, just outside Gettysburg, more Union reinforcements continue to rush to the front.

06.05 - Close up of Seminary Ridge and the Union defences.
Turn 6 12.30 - 13.00
06.06U - The Feds consolidate their defensive position along seminary ridge and around the Pennsylvania College (the white building) whilst columns of reinforcements hurry through the streets of Gettysburg.
Turn 7 - 13.00 - 13.30
07.01C - Hordes of Rebs approach Seminary Hill ominously. Ewell's Corps in the distance and Hill's on left.
07.02U - The defenders race against time to organise and prepare themselves for an assault on two fronts from west and north.
Turn 8 - 13.30 - 14.00
08.01C - The rebel assault continues. Pender's division advances on Barlow at lower left foreground while in the background Ewell goes to the assault of the ridge.
08.02U - In the face of superior forces, the Northerners withdraw, forming a crescent shape arching from Gettysburg town to the crest of Seminary ridge.
Turn 9 - 14.00 - 14.30
09.01U - Union troops make their stand around the Pennsylvania College and prepare for the onslaught.
Turn 10 - 14.30 - 15.00
10.01C - Under pressure from Northern musketry, the rebels withdraw temporarily to draw breath and recompose the line.
10.02U - The decision to abandon the ridge is taken and Reynolds takes advantage of the temporary lull to draw his men further back down the valley towards Gettysburg.

Turn 11 - 15.00 - 15.30
11.01C - Having dressed the lines, the Confederate assault reprises around Pennsylvania College together with a flanking maneuver around Gettysburg (top, right)
11.02U - The Union holds fast in the centre but continues to withdraw units to the rear from Seminary Ridge.
Turn 12 - 15.30 - 16.00
12.01C - The Confederate centre advances to with a hundred yards to the Union lines and is met by withering fire at such close range.
12.02U - The orderly withdrawal from Seminary Ridge continues while the pressure on the Union Centre reaches its peak. Can it hold?
Turn 13 - 16.00 - 16.30
13.01C - The two sides settle for a firefight around Pennsylvania College with terrible casualties for both. In the meantime, on Seminary Ridge it is down to the bayonet! (bottom left).
13.02C - A closer view of the struggle at the centre of the lines.

13.03U - Having repulsed the rebs on Seminary Ridge and thus avoided being outlfanked, the Feds abandon their position around the College and disengage with an orderly withdrawal southward.

Turn 14 - 16.30 - 17.00
14.01C - Seeing the Union centre withrdaw, Ewell seizes the moment and orders a general charge........
14.02C - .........and finally succeeds in smashing the Union line! A loud whoop of elation rises all along the rebel lines.

14.03U - The rebel joy is short lived however as much to Ewell's chagrin the Union troops quickly rally and reform in solid formation just below Cemetery Hill. In Gettysburg town proper furious hand to hand combat ensues.

Turn 15 17.00 - 17.30
15.01C - More Confederate reinforcements arrive off Seminary Ridge but they still have some way to go before getting to the front
15.02U - The two armies use a lull to get some respite and dress ranks.
15.03U - Meanwhile Union reinforcements stream by the cemetery gatehouse on Cemetery Hill
Turn 16 - 17.30 - 18.00
16.01U - Aware that his tired troops are in no shape to withstand an attack in the open, Reynolds withdraws the army towards the relative safety of Cemetery Hill
Turn 17 - 18.00 - 18.30
17.01C - Seeing the Feds retire, Ewell and Hill advance to keep up the pressure.
17.02U - The Union withdrawal continues in good order
17.03U - The Confederate columns finally make it to the front
Turn 18 - 18.00 - 18.30
18.01U - The reb advance pauses to give time for the reinforcements to merge into the front line whilst the Unionists consolidate their defences on Cemetery Hill
Turn 19 - 18.30 - 19.00
19.01C - The rebel advance resumes cautiously
19.02U - The Feds send two fresh brigades against the weak Confederate exteme left flank in an attempt to distract attention.

Turn 20 - 19.00 - 19.30 (twilight turn)
20.01C - In the fast gathering darkness at day's end, the Confederate make one last desperate attempt to break the Union centre on Cemetery Hill

20.02C - Confederate troops storm up the hill at the Union defenders

20.03C - Met by a withering barrage of musket and artillery fire the rebel charge falters and is only mildly successful........

20.04U - .......leaving the opportunity for a Union counter attack all along the line.

20.05U - The Union counterattack in the centre

20.06U - The final counterattack proves too much for the exhausted Confederate brigades. Weakened, tired and confused in the fading light, they break and run back down the hill in panic

Turn 21 - 19.30 - 20.00 (final turn)
21.01C - There is just enough light for one final rebel attack on the Union left flank at the foot of Seminary Ridge

21.02C - The attack successfully breaks through the Union left but at this point it is too dark to take any further advantage.

21.03U - The final positions. The Union army re-deploys its defences back on Cemetery Hill while the Confederates are left in control of Gettysburg and the surrounding plain.

The game resulted in a marginal Union victory with a high percentage of casualties on both sides. The general outcome was very much in line with the historical one. Apologies for the delay in my updates but it is not always easy to find the time!
Hope you enjoyed.