The next scenario decided on is Sacile 1809
We went through different OOB which we found on line and on Blunderes on the danube with many contradicting details with players in favour of OOb leaning on their side.
Finally agreed on PIMM from Age of Eagles yahoo file section
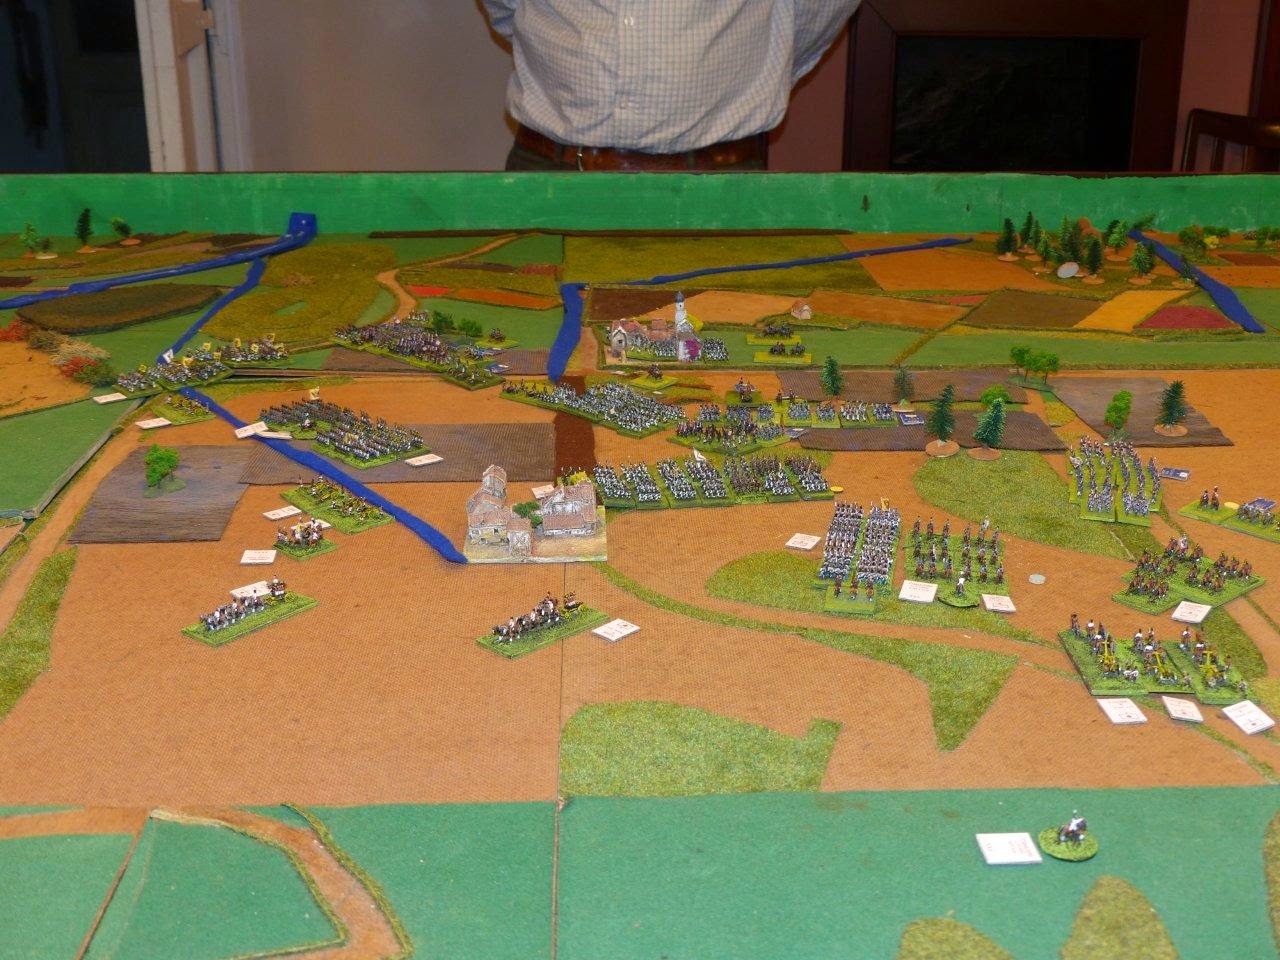
The excellent reporting and photos are again by Michael Vella in command of the Austrian forces.
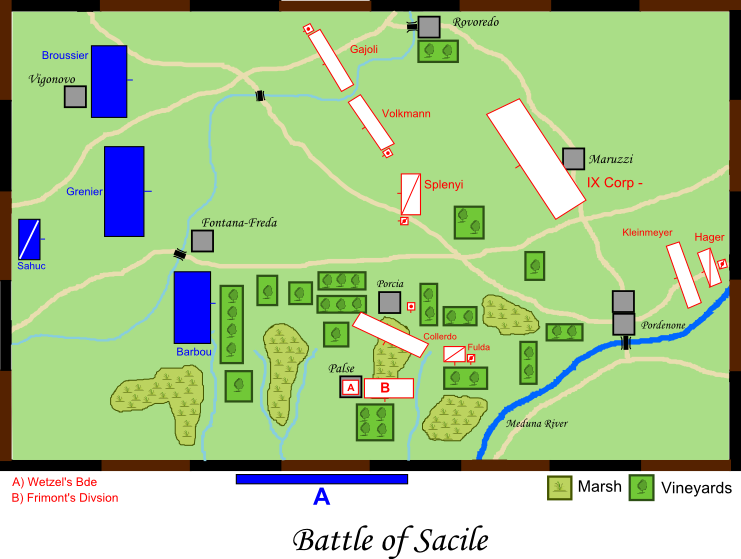

Broussier’s division before Vigonovo


01.02 - Panoramic shot facing west. The Austrian IX Korps in foreground has failed its Reserve Movement roll and remains stationary. In the centre, elements of VIII Korps deploy in line across a broad north-south front whilst French divisions advance in the far background.


04.04 - The French centre halted outside Fontana Fredda, waiting for
developments.

04.05 - Opposite, the Austrian centre similarly awaits.
End of turn 5, 11.30hrs

05.01 - Still waiting for IX Korps to activate in Reserve Movement, the
Austrian left has no option but to continue withdrawing and regrouping
around Porcia in the face of superior enemies.

05.02 - Close up of the action, the Austrian withdrawal being covered by
Splenyi's elite hussar brigade in the centre.

05.03 - While the Austrian centre remains in position, the right wing
withdraws in the face of the advancing French. Never has IX Korps been
sorely needed as now...

05.04 - Battlefield panorama showing the Austrian IX Korps motionless in the
foreground. In centre of picture, masses of troop movements can be seen
around Porcia.
End of turn 6, Midday

06.01 - The Austrian forces on the left wing withdrawal is almost complete,
taking position behind a stream facing vineyards (rough terrain) and covered
by artillery. In the background the French advance continues hampered by
even more vineyards and marshland.

06.02 - In the Austrian centre IX Korps (foreground) finally gets its
Reserve Movement roll and swings into action, advancing against the French
centre (Grenier) and left (Broussier) seen in the background.

06.03 - In the centre, Splenyi's hussars are dangerously enfiladed by
Teste's brigade of Grenier's division but get lucky when the French get a
low die roll.


06.05 - View of from another angle of the Austrian left, now mostly
entrenched behind defensive terrain.

06.06 - French and Italians march past Palse trying to catch up with the
elusive Austrians.
End of turn 7, 12.30hrs

07.01 - On the French left flank, Dutruy's brigade engages Gajoli's troops
at bayonet point with Desaix's brigade is held in reserve further back.
Grenier's troops in the French centre can be seen upper left of the picture.

07.02 - In the centre, Splenyi's hussars engage their French counterparts
under Pages, once again having gotten lucky and survived a second round of
enfilading artillery fire.

07.03 - Bird's eye view of the field, the cavalry clash clearly visible in
the centre. To the left, the lead elements of IX Korps finally make their
appearance on the field.

07.04 - The Austrian left, now firmly entrenched, awaits the onslaught.

07.05 - View of the entire field from the South, the French attacking
eastwards from left and the entire Austrian line on the right. The village
of Porcia can be seen deep in the centre of the Austrian positions.

07.06 - Dutruy's assault fails and his brigade is repulsed!

07.07 - Similarly, Splenyi's charge is well met by the French and the
Austrian elites are forced back.
End of turn 8, 13.00 hrs

08.01 - Bolstered by the arrival of IX Korps, the Austrian left now
counterattacks. Gajoli reforms his troops and engages Dutruy's brigade in a
firefight while Marziani's brigade charges Desaix's troops. In the centre,
Grenier is now also facing advancing Austrians.

08.02 - The battlefield centre with the two armies getting ever closer
around Porcia.

08.03 - Hager's dragoons and Kienmayer's grenadiers finally arrive to
relieve the Austrian left, now firmly engaged against the French.

08.04 - Garreau's mixed brigade preparing their assault under enfilading
fire from Austrian artillery positioned inside the village of Porcia
(off-picture).

08.05 - Severoli's Italians debouch from Palse hampered by ever-present
rough terrain.

08.06 - Another view of the centre...

08.07 - ....and of the Austrian left vs the French right.

08.08 - Desaix is thrown back with casualties!


09.02 - Volkmann's mixed brigade supported by Gavassini's brigade engage
Abbe's infantry from Grenier's division in the centre.

09.03 - General view of the Austrian right and centre. In foreground,
Dutruy's infantry of Brussier's division hold off superior numbers of
Austrian infantry whilst on extreme right, the other brigade of Brussier's
division (Desaix) has been pushed back and is now reduced to 'worn' status.
In the centre Volkmann and Gavassini advance on Abbe while to the left the
fighting around Porcia rages on.

09.04 - Another view of the centre, with more of Porcia in view. Note the
three Austrian batteries (bottom) being shifted to reinforce the centre.

09.05 - The Austrian left flank seen from behind Austrian lines. In the
foreground Hager's dragoons rush to reinforce Splenyi's cavalry in the
centre.

09.06 - Bird's eye view of the battlefield showing the Austrian left and
centre. Note the strategic position of the village of Porcia, very
prominently in the centre of the field.

09.07 - The Austrian left and French right lock horns.

End of Turn 10 - 14.00 hrs
10.01 - General assault on the French left and centre. In the foreground
Marziani's brigade engages Desaix once more while Volkmann's infantry hits
Abbe hard. Behind, Gavassini faces to the flank to counter the threat of
Pages' advancing cavalry.

10.02 - Around Porcia, the Austrians launch their own counterattack, hoping
to catch the advancing French columns off guard.

10.03 - Back to the extreme French left, Dutruy's infantry is pinned by
Gajoli to the front and outflanked by Kalnassy. To the rear, Desaix infantry
is shattered, leaving Gajoli hopelessly stranded in dire straits.

10.04 - In the centre Abbe is pushed back in disarray but is not broken by
Volkmann. In the foreground, Desaix's infantry can be seen disordered and
broken on the right, with Marziani's victorious infantry in pursuit. To the
left, Pages' cavalry advances threateningly on Gavassini.

10.05 - The Austrian artillery takes up position in the centre flanked by
the masses of cavalry.

10.06 - The Austrian counterattack around Porcia succeeds in pushing back
the French. However the attackers are far from broken.

10.07 - Another view of the stalled French advance before Porcia.


11.02 - Panoramic view along the two lines. The fighting around Porcia rages
in the foreground while in the centre the Austrian cavalry has made inroads
and penetrated deep into the French centre. In the background the French
left wing continues its withdrawal after suffering successive defeats at
bayonet point.

11.03 - With Austrian cavalry pouring into the gap in the French centre, the
situation at this point of the French line is fast becoming critical.
Pages' French cavalry have fallen to 'worn' status while next to them
Teste's infantry have formed square.

11.04 - Heavily outnumbered and severely mauled, the French left withdraws
but is given no respite by the advancing Austrian infantry. Outgunned and
outnumbered, Abbe's worn infantry retires in the face two fresh Austrian
brigades.

11.05 - View of the Porcia area looking north east from behind French lines.

11.06 - Another view from behind French lines, this time facing south east.
In the foreground the French left and centre withdraws while in the far
background the French desperately try to break the Austrian line before
Porcia before being enveloped entirely by the Austrian cavalry.

11.07 - The Austrian right wing advances.

End of Turn 12 - 15.00
12.01 - The advance of the Austrian right continues unabated. The situation
on French left is now critical.

12.02 - In the centre both cavalry forces pause to reform and regain their
breath. With Austrian cavalry marauding so close, Abbe keeps his brigade in
square.

12.03 - Before Porcia, the French (right) retire to redress their lines.

12.04 - View south east from the centre of the field. The French left wing
is now in danger of being enveloped by the Austrian cavalry in the centre.
At bottom left, Austrian infantry and artillery from the victorious right
wing march to exploit the French weak centre.

12.05 - Same situation, wider view.

12.06 - Bird's eye view from far behind Austrian lines. The Austrian right
is now virtually unopposed and has advanced as far as Fontana Fredda. The
hole in the French centre is very apparent while on the left the French
retire back towards Palse.

End of Turn 13 - 15.30
13.01 - The Austrians keep up their pursuit of the French left which retires
towards Vigonovo at the far Western end of the table.

13.02 - The centre of the field showing Austrian infantry being shifted from
the left wing to the centre. After more clashes, Pages' cavalry has now been
reduced to 'spent' status and is now in danger of being swept away. If this
cavalry had to succumb, the French centre would be in dire straits indeed.

13.03 - Another view of the centre. With the French cavalry badly blooded
and the infantry pinned in square, Austrian artillery moves up to finish the
job.

13.04 - Colloredo debouches from Porcia and pushes back Roize's brigade of
Barbou's division at bayonet point.

13.05 - The situation before Porcia at 15.30. Faced with the real danger of
being entirely enveloped, the French right now hesitates to advance further
and withdraws in good order towards Palse. Colloredo's assault can be seen
at lower right.

13.06 - Roize is forced to retire, further exposing the French left wing to
envelopment from Colloredo and the advancing Volkmann supported by Splenyi's
cavalry (bottom right).

13.07 - Panoramic view looking south. The French left and centre are
nowhere to be seen while the left struggles to avoid envelopment.

14.02 - The Austrian lines have now taken a distinct horseshoe shape with
both ends thrown forward in an attempt to close in and obliterate the
remnants of the French army now concentrated upon Palse.

14.03 - Close up of the French and Italian forces at bay around Palse.

14.04 - Diametrically opposed view, this time from SE looking NW. French and
Italians on left, Austrians on right.

14.05 - Long shot of the entire field, again facing NW. In the far distance,
save for Desaix's spent brigade, the French left wing has completely
disintegrated and is nowhere to be seen.

End of Turn 15 - 16.30
15.01 - The Austrian right wing now starts a sweeping movement to the south
in an attempt to cut the French line of retreat. To the right of picture the
town of Fontana Fredda is now firmly in Austrian hands.

15.02 - Another view of Fontana Fredda and the centre of the field. Pages'
cavalry has retreated beyond the river giving free rein to their Austrian
counterparts who continue to threaten the retreating infantry.

15.03 - Severoli's Italians prepare to defend Palse dearly.

15.04 - View SE showing centre and French left, now in full but orderly
retreat.

15.05 - Another view of Palse's defenders.

End of Turn 16 - 17.00 hrs
16.01 - The French and Italians have now retreated beyond Palse and with
twilight fast approaching the Austrians relent in their pursuit.

16.02 - The French right wing continues its retreat in good order.......

16.03 - ......while the Austrian pursuers pause, exhausted by a whole day of
fierce fighting.

16.04 - Another view of the final act.

16.05 - In the foreground the Austrian right wing has now reached the centre
of the field and continues southward to cut off the French lines of
communication.

The game ended at this point since Turn 17 is a twilight turn and it was
pretty much pointless to carry it out. An enjoyable game all in all which
started well for the French but turned nasty for them once the Austrian IX
Korps mobilised. At that point Eugene's French became outnumbered and the
collapse of the French left wing sealed his fate. In a way this was quite
close to what happened in real life.
Thanks to all for good game. Now for the next one...
We went through different OOB which we found on line and on Blunderes on the danube with many contradicting details with players in favour of OOb leaning on their side.
Finally agreed on PIMM from Age of Eagles yahoo file section
The excellent reporting and photos are again by Michael Vella in command of the Austrian forces.
- Bird’s eye view of table looking west from behind Austrian lines
Deploy 03 - Austrian advance guard in and around Palse facing Severoli’s Italian and Seras’ French divisions.
Deploy 04 - Austrian IX Corps around Maruzzi.
Deploy 05 - Barbou’s division south of Fontana Fredda.
01.01 - Severoli and Seras advance towards Palse across vineyard and marsh. On the right flank Roussel’s brigade is held back, to avoid being threatened by Fulda’s 5th hussars of VIII Korps (lower foreground).
01.03 – Barbou’s division advances east across vineyards towards Palse with Colloredo’s brigade lying in wait.
01.04 – Another view of the centre of the field.
02.01 – Supported by Splenyi’s hussars, Colloredo advances his infantry into vineyards which – as rough ground offer a defensive advantage.
02.02 – Under sparse artillery fire Seras and Severoli’s divisions loom closer to Palse, defended by Wetzel’s grenzers and Schmidt’s line troops of Frimont’s Advance Guard.
02.03 – Grenier’s division advances westward, halting across the river before Fontana Fredda.
03.01 – Faced by overwhelmingly superior numbers, Frimont withdraws from Palse and retires northwards towards the cover of the main Austrian forces.
03.02 – Long shot of the situation around Palse showing the advancing French (left and background) and retiring Austrians (centre and right).
03.03 – At the north end of the table, Broussier’s division advances rapidly across open ground whilst in the centre Grenier holds his ground. VIII Korps remains deployed in line in the centre of the Austrian positions with elements of IX Korps still stationary in the lower foreground, having failed their Reserve Movement rolls for 3 moves in succession.
03.04 – A closer view of Broussier’s (front) and Grenier’s division (back).
03.05 – Another view of Ignaz Gyulai’s IX Korps, still awaiting movement orders……
03.06 - ……while his brother Albert’s VIII Korps and Frimont’s advance guard withdraw from Palse in good order.
03.07 – At the furthest end of the field, Hager’s Heavy Cavalry brigade and Kienmayer’s Grenadier reserves await orders to move together with the rest of IX Korps.
04.01 - The Austrian left wing continues its orderly withdrawal towards
Porcia (partly visible, right) whilst the French enter the now empty town of
Palse.
Porcia (partly visible, right) whilst the French enter the now empty town of
Palse.
04.02 - Close up of the withdrawing Austrians
04.03 - View of the same area from behind the French lines, with
04.03 - View of the same area from behind the French lines, with
Severoli's
Italians in the foreground (unit counters in green)
Italians in the foreground (unit counters in green)
04.04 - The French centre halted outside Fontana Fredda, waiting for
developments.
04.05 - Opposite, the Austrian centre similarly awaits.
End of turn 5, 11.30hrs
05.01 - Still waiting for IX Korps to activate in Reserve Movement, the
Austrian left has no option but to continue withdrawing and regrouping
around Porcia in the face of superior enemies.
05.02 - Close up of the action, the Austrian withdrawal being covered by
Splenyi's elite hussar brigade in the centre.
05.03 - While the Austrian centre remains in position, the right wing
withdraws in the face of the advancing French. Never has IX Korps been
sorely needed as now...
05.04 - Battlefield panorama showing the Austrian IX Korps motionless in the
foreground. In centre of picture, masses of troop movements can be seen
around Porcia.
End of turn 6, Midday
06.01 - The Austrian forces on the left wing withdrawal is almost complete,
taking position behind a stream facing vineyards (rough terrain) and covered
by artillery. In the background the French advance continues hampered by
even more vineyards and marshland.
06.02 - In the Austrian centre IX Korps (foreground) finally gets its
Reserve Movement roll and swings into action, advancing against the French
centre (Grenier) and left (Broussier) seen in the background.
06.03 - In the centre, Splenyi's hussars are dangerously enfiladed by
Teste's brigade of Grenier's division but get lucky when the French get a
low die roll.
06.04 - Another view of the Austrian centre and right wing. At extreme
right Dutruy's elite infantry attempts an outflanking movement against
Gajoli's regulars.
right Dutruy's elite infantry attempts an outflanking movement against
Gajoli's regulars.
06.05 - View of from another angle of the Austrian left, now mostly
entrenched behind defensive terrain.
06.06 - French and Italians march past Palse trying to catch up with the
elusive Austrians.
End of turn 7, 12.30hrs
07.01 - On the French left flank, Dutruy's brigade engages Gajoli's troops
at bayonet point with Desaix's brigade is held in reserve further back.
Grenier's troops in the French centre can be seen upper left of the picture.
07.02 - In the centre, Splenyi's hussars engage their French counterparts
under Pages, once again having gotten lucky and survived a second round of
enfilading artillery fire.
07.03 - Bird's eye view of the field, the cavalry clash clearly visible in
the centre. To the left, the lead elements of IX Korps finally make their
appearance on the field.
07.04 - The Austrian left, now firmly entrenched, awaits the onslaught.
07.05 - View of the entire field from the South, the French attacking
eastwards from left and the entire Austrian line on the right. The village
of Porcia can be seen deep in the centre of the Austrian positions.
07.06 - Dutruy's assault fails and his brigade is repulsed!
07.07 - Similarly, Splenyi's charge is well met by the French and the
Austrian elites are forced back.
End of turn 8, 13.00 hrs
08.01 - Bolstered by the arrival of IX Korps, the Austrian left now
counterattacks. Gajoli reforms his troops and engages Dutruy's brigade in a
firefight while Marziani's brigade charges Desaix's troops. In the centre,
Grenier is now also facing advancing Austrians.
08.02 - The battlefield centre with the two armies getting ever closer
around Porcia.
08.03 - Hager's dragoons and Kienmayer's grenadiers finally arrive to
relieve the Austrian left, now firmly engaged against the French.
08.04 - Garreau's mixed brigade preparing their assault under enfilading
fire from Austrian artillery positioned inside the village of Porcia
(off-picture).
08.05 - Severoli's Italians debouch from Palse hampered by ever-present
rough terrain.
08.06 - Another view of the centre...
08.07 - ....and of the Austrian left vs the French right.
08.08 - Desaix is thrown back with casualties!
End of Turn 9 - 13.30
09.01 - The French right wing advances upon the Austrian positions around
Porcia. In the bottom foreground, IX Korps elite grenadier reserves arrive
in the nick of time to shore up the defenders.
Porcia. In the bottom foreground, IX Korps elite grenadier reserves arrive
in the nick of time to shore up the defenders.
09.02 - Volkmann's mixed brigade supported by Gavassini's brigade engage
Abbe's infantry from Grenier's division in the centre.
09.03 - General view of the Austrian right and centre. In foreground,
Dutruy's infantry of Brussier's division hold off superior numbers of
Austrian infantry whilst on extreme right, the other brigade of Brussier's
division (Desaix) has been pushed back and is now reduced to 'worn' status.
In the centre Volkmann and Gavassini advance on Abbe while to the left the
fighting around Porcia rages on.
09.04 - Another view of the centre, with more of Porcia in view. Note the
three Austrian batteries (bottom) being shifted to reinforce the centre.
09.05 - The Austrian left flank seen from behind Austrian lines. In the
foreground Hager's dragoons rush to reinforce Splenyi's cavalry in the
centre.
09.06 - Bird's eye view of the battlefield showing the Austrian left and
centre. Note the strategic position of the village of Porcia, very
prominently in the centre of the field.
09.07 - The Austrian left and French right lock horns.
End of Turn 10 - 14.00 hrs
10.01 - General assault on the French left and centre. In the foreground
Marziani's brigade engages Desaix once more while Volkmann's infantry hits
Abbe hard. Behind, Gavassini faces to the flank to counter the threat of
Pages' advancing cavalry.
10.02 - Around Porcia, the Austrians launch their own counterattack, hoping
to catch the advancing French columns off guard.
10.03 - Back to the extreme French left, Dutruy's infantry is pinned by
Gajoli to the front and outflanked by Kalnassy. To the rear, Desaix infantry
is shattered, leaving Gajoli hopelessly stranded in dire straits.
10.04 - In the centre Abbe is pushed back in disarray but is not broken by
Volkmann. In the foreground, Desaix's infantry can be seen disordered and
broken on the right, with Marziani's victorious infantry in pursuit. To the
left, Pages' cavalry advances threateningly on Gavassini.
10.05 - The Austrian artillery takes up position in the centre flanked by
the masses of cavalry.
10.06 - The Austrian counterattack around Porcia succeeds in pushing back
the French. However the attackers are far from broken.
10.07 - Another view of the stalled French advance before Porcia.
End of Turn 11 - 14.30
11.01 - The seesaw battle in the marshes and vineyards around Porcia
continues unabated, no side yet having gained the upper hand. View from
behind Austrian lines looking south west. The village of Porcia can be seen
in background.
11.01 - The seesaw battle in the marshes and vineyards around Porcia
continues unabated, no side yet having gained the upper hand. View from
behind Austrian lines looking south west. The village of Porcia can be seen
in background.
11.02 - Panoramic view along the two lines. The fighting around Porcia rages
in the foreground while in the centre the Austrian cavalry has made inroads
and penetrated deep into the French centre. In the background the French
left wing continues its withdrawal after suffering successive defeats at
bayonet point.
11.03 - With Austrian cavalry pouring into the gap in the French centre, the
situation at this point of the French line is fast becoming critical.
Pages' French cavalry have fallen to 'worn' status while next to them
Teste's infantry have formed square.
11.04 - Heavily outnumbered and severely mauled, the French left withdraws
but is given no respite by the advancing Austrian infantry. Outgunned and
outnumbered, Abbe's worn infantry retires in the face two fresh Austrian
brigades.
11.05 - View of the Porcia area looking north east from behind French lines.
11.06 - Another view from behind French lines, this time facing south east.
In the foreground the French left and centre withdraws while in the far
background the French desperately try to break the Austrian line before
Porcia before being enveloped entirely by the Austrian cavalry.
11.07 - The Austrian right wing advances.
End of Turn 12 - 15.00
12.01 - The advance of the Austrian right continues unabated. The situation
on French left is now critical.
12.02 - In the centre both cavalry forces pause to reform and regain their
breath. With Austrian cavalry marauding so close, Abbe keeps his brigade in
square.
12.03 - Before Porcia, the French (right) retire to redress their lines.
12.04 - View south east from the centre of the field. The French left wing
is now in danger of being enveloped by the Austrian cavalry in the centre.
At bottom left, Austrian infantry and artillery from the victorious right
wing march to exploit the French weak centre.
12.05 - Same situation, wider view.
12.06 - Bird's eye view from far behind Austrian lines. The Austrian right
is now virtually unopposed and has advanced as far as Fontana Fredda. The
hole in the French centre is very apparent while on the left the French
retire back towards Palse.
End of Turn 13 - 15.30
13.01 - The Austrians keep up their pursuit of the French left which retires
towards Vigonovo at the far Western end of the table.
13.02 - The centre of the field showing Austrian infantry being shifted from
the left wing to the centre. After more clashes, Pages' cavalry has now been
reduced to 'spent' status and is now in danger of being swept away. If this
cavalry had to succumb, the French centre would be in dire straits indeed.
13.03 - Another view of the centre. With the French cavalry badly blooded
and the infantry pinned in square, Austrian artillery moves up to finish the
job.
13.04 - Colloredo debouches from Porcia and pushes back Roize's brigade of
Barbou's division at bayonet point.
13.05 - The situation before Porcia at 15.30. Faced with the real danger of
being entirely enveloped, the French right now hesitates to advance further
and withdraws in good order towards Palse. Colloredo's assault can be seen
at lower right.
13.06 - Roize is forced to retire, further exposing the French left wing to
envelopment from Colloredo and the advancing Volkmann supported by Splenyi's
cavalry (bottom right).
13.07 - Panoramic view looking south. The French left and centre are
nowhere to be seen while the left struggles to avoid envelopment.
End of Turn 14 - 16.00 hrs
14.01 - The Austrian right (foreground) advances unopposed while in the
centre the envelopment of the French continues.
14.01 - The Austrian right (foreground) advances unopposed while in the
centre the envelopment of the French continues.
14.02 - The Austrian lines have now taken a distinct horseshoe shape with
both ends thrown forward in an attempt to close in and obliterate the
remnants of the French army now concentrated upon Palse.
14.03 - Close up of the French and Italian forces at bay around Palse.
14.04 - Diametrically opposed view, this time from SE looking NW. French and
Italians on left, Austrians on right.
14.05 - Long shot of the entire field, again facing NW. In the far distance,
save for Desaix's spent brigade, the French left wing has completely
disintegrated and is nowhere to be seen.
End of Turn 15 - 16.30
15.01 - The Austrian right wing now starts a sweeping movement to the south
in an attempt to cut the French line of retreat. To the right of picture the
town of Fontana Fredda is now firmly in Austrian hands.
15.02 - Another view of Fontana Fredda and the centre of the field. Pages'
cavalry has retreated beyond the river giving free rein to their Austrian
counterparts who continue to threaten the retreating infantry.
15.03 - Severoli's Italians prepare to defend Palse dearly.
15.04 - View SE showing centre and French left, now in full but orderly
retreat.
15.05 - Another view of Palse's defenders.
End of Turn 16 - 17.00 hrs
16.01 - The French and Italians have now retreated beyond Palse and with
twilight fast approaching the Austrians relent in their pursuit.
16.02 - The French right wing continues its retreat in good order.......
16.03 - ......while the Austrian pursuers pause, exhausted by a whole day of
fierce fighting.
16.04 - Another view of the final act.
16.05 - In the foreground the Austrian right wing has now reached the centre
of the field and continues southward to cut off the French lines of
communication.
The game ended at this point since Turn 17 is a twilight turn and it was
pretty much pointless to carry it out. An enjoyable game all in all which
started well for the French but turned nasty for them once the Austrian IX
Korps mobilised. At that point Eugene's French became outnumbered and the
collapse of the French left wing sealed his fate. In a way this was quite
close to what happened in real life.
Thanks to all for good game. Now for the next one...